In September (15th and 16th) we will be organising an IoT Hackathon together with Oracle. I will write several post here concerning IoT, starting with this one where I tell you how to do the default setup of your Raspberry PI. See also this two minute tech tip that is an intro to this post.
For configuring your raspberry Pi there are several options. I prefer to use a keyboard, monitor and mouse so I can actually see what I am doing. The Pi has several USB ports and also an HDMI port.

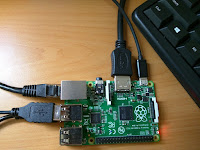 So if you have a monitor, keyboard and a mouse available, you can plug those into your Raspberry Pi and you are all set. Connect to the power and the Pi will boot into an initial setup screen that allows you to select your preferred OS. That is of course only if you inserted an SD card in the Pi that contains the various available OS's. Select your preferred OS and click install so that the Operating System gets installed. After a short while, the installation is complete.

Once the install has finished you need to confirm by clicking OK, the system reboots, and you will automatically enter the Raspberry Pi Configuration Tool (raspi-config)

One of the things you should do is to enable SSH so you can actually enter your raspi from a different computer. I'm not sure if it is enabled by default, but just go into the raspi-config, select Advanced Options (8) and go into A4 SSH to enable it.
You can also change the default password (which is raspberry) and the default name of the device (which is raspberrypi).
Reboot one more time to activate the changes, and you are ready to start programming.
If you are happy with commandline interface, you can go wild on that one, but if you prefer to work in a GUI, you will be able to change that by using raspi-config. Open raspi-config by typing:

For configuring your raspberry Pi there are several options. I prefer to use a keyboard, monitor and mouse so I can actually see what I am doing. The Pi has several USB ports and also an HDMI port.

 So if you have a monitor, keyboard and a mouse available, you can plug those into your Raspberry Pi and you are all set. Connect to the power and the Pi will boot into an initial setup screen that allows you to select your preferred OS. That is of course only if you inserted an SD card in the Pi that contains the various available OS's. Select your preferred OS and click install so that the Operating System gets installed. After a short while, the installation is complete.
Once the install has finished you need to confirm by clicking OK, the system reboots, and you will automatically enter the Raspberry Pi Configuration Tool (raspi-config)

One of the things you should do is to enable SSH so you can actually enter your raspi from a different computer. I'm not sure if it is enabled by default, but just go into the raspi-config, select Advanced Options (8) and go into A4 SSH to enable it.
You can also change the default password (which is raspberry) and the default name of the device (which is raspberrypi).
Reboot one more time to activate the changes, and you are ready to start programming.
If you are happy with commandline interface, you can go wild on that one, but if you prefer to work in a GUI, you will be able to change that by using raspi-config. Open raspi-config by typing:
sudo raspi-config

That will be all for now. I will continue posting about our IoT Hackathon. More info can be found here.
Comments